24 March 2010

Lockers

Yes, it is possible to get an inflatable dinghy into the cockpit locker. And a 16L fuel tank, although it is a bit of a squeeze. The dinghy was a real find. I got it at a boat jumble for £150 because it had been covered in mud by a dirty dog that had jumped all over it. It is a transom sterned inflatable, about 2.1m long, but narrower than normal. I am not sure a normal width one would fit in, but a round tailed dinghy would go in without much problem. Also in the locker are the floor boards, thwart, oars and pump, so it is all really there. You can see the dinghy being towed behind Daisy G in the second photo.

There is an enormous amount of locker space in the boat. The two sternmost cockpit lockers are still big in themselves. You can just see the circular hatch of the starboard locker on the right of the photo. I have all my spare ropes, fenders, snorkel and flippers in there. The port locker is quite empty. I am trying to balance the boat as the 50L water tank is on the port side, and the  boat lists a little that way when it is full if you don't counterbalance it.

You can just about see the lock hasp on the locker lid. It was in the centre originally, but I have moved it to the aft end. In the middle it was exactly at ankle position and everyone on board hit it sooner or later and yelped. It might not be so secure at one end, but the lid could easily be unscrewed by a determined thief so it is not super secure anyway. I don't think you  gain much from big strong locks on a boat. A serious thief will just smash in the doors or washboards, causing horrible damage. All you can do is discourage the opportunistic thief by using padlocks and hope they go and look somewhere else. I had an outboard stolen from my old boat, even though it was padlocked to the transom. Now I take the engine off, which is a pain, but at least I have still got it.

23 March 2010

Protection in place

I have wanted to sort this out for ages. I have a littel marble statue of the Hindu god Ganesha. It was given to me by a sculptor in Mahabalipuram in Tamil Nadu several years ago. I like to have him keeping an eye on my boat, but there was nowhere to put him in Daisy G. Now I have glued a little mahogany bracket to the central compression post and he sits there keeping an eye on things for me. Dufy's girl is keeping an look out too.

14 March 2010

Cockpit cover

I have started work on a cockpit cover. I fitted two little wooden blocks just inside the cockpit coaming at the rear. Each has a 10mm hole drilled through it. A flexible fibreglass tent pole fits into these, forming a hoop at the back. I am now chopping up an old tarpaulin to cover the space between it and the spray hood. It is surprisingly rigid, but it will still probably be best to have a lashing to the mizzen mast at the high point. The fore end needs pleating a bit to fit the spray hood more snugly. It gapes on this. Ideally it should zip to the hood, but that is way beyond my sewing skills.
The boat is now all packed away, spars stowed and ready for launch. I just have to fit the tie down straps, load the engine, and she is ready to go. Roll on launch day, near rthe middle of April this year if all goes according to plan.
PS I only noticed after lashing everything down , that with the mast stowed in the lowest level for towing I can't slide the washboards up and out to get into the cabin. I hope I don't need anything out before I raise the mast...

Yuloh

I spent a very messy evening epoxying the two parts of my yuloh together. Much harder than it seemed. Screws couldn't pull the two sections together against the viscosity of the glue, so I had to stumble down to the shed in the dark to find some clamps. It all seems to have worked, but needed a fair degree of sanding in the morning to tidy it all up. This is the angle at which is seems confortable in the cockpit. Not a great deal will stick into the water, but maybe it will bury itself as it is used. find out soon.

Seen from the working end. The lanyard attaches to the end of a long eye bolt, which should tilt the oar as it is used. It is just tied to a floor board, but that should work When it is being used there will be someone standing on teh floor boards, holding them down. I have spoke shaved out two hand holds either side of the lanyard as I don't know which hand will be on the oar and which on the rope.

I was very pleased to find that it will actually store down one of the side decks. I may just take it for the Raid, but who knows, I may love it. But it certainly would be in the way if you had to rush to the fore deck at all

13 March 2010

Fully rigged

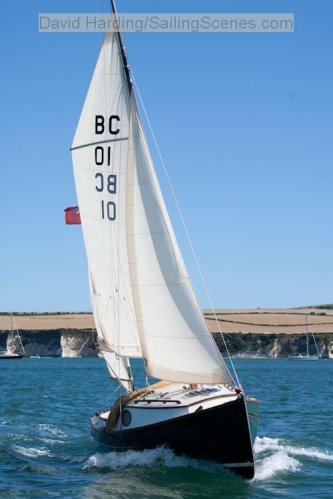
Important day today as I finally got the mast up for the first time since last September. The first picture shows her fully rigged. I am very pleased with the blue sail cover. Only £70 from ebay, as opposed to hundreds from anywhwere else. Seems to do the job. The jib luff needs tensioning. I have rigged a flag halyard on the main mast for a wind burgee, which I missed last year.
I have fitted red and green (port and starboard) lazy jacks, but still need to modify them slightly. I have got cheek blocks for them on the boom. but I think a simple fairlead would work better.


The second picture shows the revised jib tack. A ring bolt just behind the stem head. This seems to work really well. The furler works without a hitch. I have fitted snap shackles to the top of the furler and on the jib halyard. This means I can quickly unclip the jib and stow it away. It goes into one of the bow lockers, which surprised me. I now have the jib stowed in the port locker and the anchor in the  starboard one. I shall probably stow the jib when on the mooring to protect it from UV.


There isn't much spare room at the top of the jib luff, but enough. It is curious how the section of the mast around the hounds apears so black in this photo. To the eye the whole mast is just black.

I told someone that I tighten my jib luff with  handy-billy, and got a blank look in return. So this is it. A handy-billy is a wierd name for a simple mobile block and tackle you use to tighten things up. Mine is a 1:4 arrangement with a jamb cleat at the bottom. I clip the bottom to the ring bolt on the deck, lash the top to the jib halyard with a rolling hitch, and heave up to tighten. Works a treat. If I tighten the jib by hand, I can barely clip the forestay onto the stemhead. If I yank it tighter with the handy-billy, the forestay is quite slack and can easily be clipped on and then tightened witht he bottle screw. It can just be left in place, or the unlashed after belaying the halyard and used elsewhere.

And finally, my flashy new Dyneema shrouds. They are just the right length. I may have to lash out on a matching forestay at some stage. The mast is so light that I can swing it up to vertical just with muscle power. At that point the shrouds tighten and hold it laterally. I then pull in the jib halyard to hold it fore and aft. Then I go forward (after handy-billying) and secure the forestay. All quite straight forward...on a windless day.

9 March 2010

Mast Stowage

This photo shows the mast stowed, ready for trailing. It is made in two parts, with the intention of leaving the lower section bolted to the tabernacle and the upper part stowed alongside it. This works, but it is quite a job to slot the two parts together without getting all the lines tangled. I found that it is easier to unbolt the mast and slide it forward, all in one piece. It can go far enough forward that there is no significant overhang at the stern. It means when launching you have to rebolt it to the tabernacle, but that is pretty straight foward and foolproof(ish) so that is how I prefer to use it. Matt suggested permanently glueing the two parts together, but it might prove useful to be able to seperate them for storage in the future.
The mast is a very clever carbon fibre moulding. The joint is absolutely precise and solid. The top section tapers, but it is canted slightly backwards so that the rear, mast-track face, is straight and vertical for its whole height. The sail has never jambed going up or down. The mast is light enough for me to carry around easily and to push upright on my own.

Spray hood back on and mooring lines in place

Most of the painting and staining is now done (probably all of it in fact, I'm sick of paint) so I have fitted the spray hood back on. They are ugly things, but very welcome when you need it. I have sailed with it in place, which is possible, but tricky in confined areas. The view is fairly restricted. It does keep the spray off if you are motoring into the wind.

There is a huge amount of space under the hood. I have planned to fit a tent hoop over the rear of the cockpit to hold an additional cockpit awning, but I am not sure it is really necessary. The hood covers half the cockpit as it is.


One trick I have carried over from my old boat is to have cleats at the midpoint on the side decks, with permanently fitted bow mooring lines coming back to them. I can moor just with the loose end of the line from that cleat, or unbelay it and pass it to someone for a tow (I've done that a few times when engines have failed). If I am single handed it menas I never have to go on the fore deck. My BayCruiser has got little closed fairleads in the bow which are perfectly sited to allow this, but I don't think they are present on the second boat.

7 March 2010

Cabin lamp

I have finally got a new oil lamp for the cabin. I have looked at various gimballed yacht lamps, but the prices are very high and the quality is a bit doubtful on some I've seen. I spotted this one on a hurricane lamps website and have just hung it. Very pleased with it. A good flame, so the light should be good, plus a reflector to concentrate it on the cabin table. Only £30 which can't be bad. I have also got a very standard hurricane lamp which I hang as an anchor light. It never blows out and will burn well for a whole night.
I have fitted a little plywood infill on top of the folded table, with a piece of vinyl flooring glued to the top. Makes it more comfortable to sit on the folded table whilst playing with the cooker, and also gives a spot to stand on when you enter the cabin, without marking the table. The underside is just plane plywood and I use it for a cutting board when cutting ropes or anything else.
Under the bridge deck you can see my new, extra heavy duty rubber bucket. It is a very tight fit, but it is super strong and should be usable for anything. Even a sea anchor should such a need arise. A bucket is one of the indespensibles on a boat.
It was a sunny day today, so I have managed to paint the cabin top, fore and side decks with ivory paint with a non-slip additive. Went on easily and although there was a very small amount of additive, you can see the texture in the paint. I have also restained most of the woodwork. Miles and miles of masking tape. It seemed to take longer to get off than to put on.

3 March 2010

What's in a name?

This old family photo was taken, we think, around 1916. I am just printing off a copy to stick in my boat. The older girl on the left is my Auntie Nell. The younger girl on the right is my mother, Daisy Grace.
So now you know.

Nearly there

Paintwork finally touched up on the outside. I had to buy a 750ml can of Donegal Green and I only needed about a brush full. I am tempted, if time allows, to give her a complete new coat of green. It doesn't take that long if the  weather warms a bit. I always use rollers. The finish isn't perfect, but far better than I can acheive with a brush. The topsides are all masked up so I can paint a non-slip coat to the cabin top, foredeck and side decks, which do get slippery when wet. I will give another stain coat to all the bright woodwork and then possibly a final coat of ivory to the remaining white woodwork. I only have about two weekends left before we go on holiday and then it will be launch day.

Fore peak

The forepeak berths are comfortable but they look a bit stark to me. All that white wall space looks a bit sterile. I am highly tempted to fit a couple of circular mirrors, one to port, one to starboard. I have seen some cheap ones and I think they might look like extra portholes. On the other hand, they might just look silly. We shall see.

Cabin filling up


Most jobs completed now apart from exterior painting. These views show the general fit out around the rear of the cabin. Bunk mattresses and Indian cushions in place, so it looks more comfortable. The new storage shelf above the quarter berth projects a bit into the sitting space on that side, but I decided that as that would be the crew seat there was no problem... The two grey drinks can holders hooked on the shelf cost me 88p each from a car accessory shop. The equivalent from a yacht chandlers are £24.95!
The boxing behind the sink hides all of the ballast tank and fresh water plumbing as well as giving storage for all the essentials such as coffee and tea. Under the companion way you can just see the chemical loo tucked under the bridge deck. Again, all of the pipe work for the ballast tank is now largely hidden.

Ship's chronometre

I have wanted a decent clock for ages. One that is easy to read and can be seen from the cockpit. I was staggered by the price of quartz "Cabin Clocks" even little ones. I also could not decide where to fit it. Then I came up with this. Certainly easy to see from the cockpit. Very accurate time with a quartz movement, and only £2.99 from Argos, including battery. It does have a very loud tick though... 
The cushion covers are Indian. We have had them for several years, and I think this makes a good home for them.