Took an opportunity to fit the forward ends of two more stringers. The chamfers are very long and twisted now. Again the pull saw cuts most of it and a bit of sanding to fit it. All fiddly as each frame joint has to be glued, drilled, nailed and then surrounded in glue. Then the stem joint has to be copper riveted and bound with twine and glued all round.
Finished restaining the hardwood on Daisy G. She is looking a well used boat, with many dents and dings in her rubbing strips, but that is what they are there for. Quite a bit of paint came off with the masking tape, so there will be some touching up needed. Inside of cockpit still to do in cream before I tackle the green hull.
24 December 2012
22 December 2012
Four stringers fully fitted (1.5 hours)


21 December 2012
First stringer secured to bow (about 1hr)


19 December 2012
Stringers dry fitted (1 hr)


18 December 2012
Canoe keel


17 December 2012
Intermediate frames in (1hr)

I have pushed the first stringer into place on each side as this is the one which sets the symmetry of the whole set up. This is a tight fit, but it has to be. Gentle tapping with a soft mallet has got everything lining up quite well.
I think the central frame is fractionally too narrow, as the line of the stringer is pinched in slightly at the middle. Little I can do about it with precut frames, but a point to note for the designer. Interestingly, if I pop the stringer out of the centre frame, it adopts a much smoother line around the centre, but its line towards each end then becomes pinched. Getting a boat fair is really not a trivial matter, and this canoe is effectively a prototype.
The large keel timber is temporary. It is effectively a straight edge which clips over the true keel, which is only 10x10mm, to keep it straight. When all the stringers are fixed, it comes off. The stringers are fixed with Sikaflex and a copper ring barbed nail through a pre-drilled pilot hole. Seems to work well.
16 December 2012
Started on Canoe (4 hours)


I also stained some of the woodwork on Daisy G. It is cold, so it will take a while to dry. Not ideal conditions for paint and varnish.
9 December 2012
Too cold to do much


20 November 2012
Outboard well blanking plate complete


13 November 2012
English Raid 2013
Next year's English raid will be on the Norfolk Broads from Aug 5-9.
Details on the Raid website
http://www.raidengland.org/
I'm working on the map
View RAID England 2013 in a larger map
Details on the Raid website
http://www.raidengland.org/
I'm working on the map
View RAID England 2013 in a larger map
12 November 2012
Outborad well blanking plate made


5 November 2012
Painting progresses

I am staining the hardwood trim with Sikkens Filter seven, which was used originally and seems to work very well. Some people don't like the matt finish, but I prefer it. My shiny varnish never looks good, and gets scraped as soon as I start sailing.
Starting to refit ropes to the cabin top. I have washed the jibs sheets in the washing machine and they have come up soft and as new. I want to replace the main sheet as it is really not quite long enough. It used to be the jib halyard, and it is about a meter too short for ideal. I may wait until the West Midlands Boat Jumble in February. Always a good place to get rope.
3 November 2012
Table done and playing with router

Final coat of paint on the cabin roof and I will start on the cabin sides next.
2 November 2012
Pianting and other jobs under way

I have invested in some far more expensive masking tape this year. I used cheapo stuff from Lidls last year, and as they say, you get what you pay for. It kept tearing as I pulled it off the roll, and if it was left on more than a day it was very hard to get off. This is green "Frog tape" which went on easily, and I have just removed some after nearly two weeks, and it came off smoothly.


30 October 2012
International exposure.
The current copy of Woodenboat Magazine (Nov/Dec) has a good article by Kathy Mansfield on Swallowboats, their history and range of boats. There is a fine picture of Daisy Grace in amongst all the others, being helmed by my daughter at the English Raid on the Solent in 2010. I'm clearly just mobile ballast. I know my place when she's onboard.
21 October 2012
Latest project, build a canoe
I have just picked up the kit for a salmonboat Chinook canoe. This is what it should look like when finished:
 This is what it looks like now, a roll of linen, three CNC plywood panels of frames and thwarts, a bundle of softwood stringers, a flask of activated linseed oil and various additives, threads and glues. The idea is that the frames and stringers are covered in the linen, which is soaked in the activated linseed oil. When exposed to UV light this cures to a firm resin. If it doesn't I shall get very wet, but it should do.
 This will keep me busy for the winter. Need to finish various bits on Daisy G first, and then I need to build the building base.


14 October 2012
Outboard well blanking plate


12 October 2012
Goose neck slide repaired


7 October 2012
Outboard well infill

The stern end of the opening had a single plastic flap right across it, held in place by a strip of plywood across the back of the opening. The screw heads were full of epoxy and irremovable. The multi tool came into its own again and cut them off flush using a metal cutting blade.
6 October 2012
Winter jobs done


3 October 2012
Outboard well flaps


30 September 2012
Doing it properly for once


29 September 2012
Jobs progressing
I still haven't completely emptied the boat, but I have already done several jobs. All "water tight" hatches removed. They all leaked, and it turns out none had been bedded on sealant fully. I bailed five bucket loads of rain water out of the stern cockpit lockers. It must have all got in through poor seals.
I have also rerouted the cable from the solar panel into the cabin in a route that keeps it away from various ropes. This require the companionway hatch being removed, but that needed some repairs anyway, so it needed to come off.
I have also been planing down the timber trim around the cabin roof. It has always stood slightly proud of the roof, making a potential water trap. A sharp block plane reduced it to flush all round and my wonderful new multi-tool has sanded it all smooth in no time. I love it.
25 September 2012
Winter work already underway
I bought myself a Bosch cordless multitool and already wonder how I managed without. I have moved the tracks for the jib sheet lead blocks further back. I have wanted to do it all year. That left three bolt holes in each grab rail. I simply drilled them bigger, hammered in some dowelling and then cut them off flush with the multi cutter. Swapped to a narrow sanding attachment and the whole job was smoother and finished in a few minutes. I then used the same sander to clear off all of the paint drips I had got on the cabin roof edge, which I have not been able to do with a large sander, and couldn't face doing manually. By the end of the winter I shall either have an immaculate boat, or a very large pile of saw dust. It is quite addictive...
http://www.axminster.co.uk/bosch-bosch-gop108v-all-rounder-kit-with-36-accessories-in-systainer-kit-prod797263/
http://www.axminster.co.uk/bosch-bosch-gop108v-all-rounder-kit-with-36-accessories-in-systainer-kit-prod797263/
22 September 2012
Haul out day

Towed home with no problems and no losses as far as I can tell. No major works planned for the winter other than a complete, proper repaint. There are lots of bumps and scrapes which need to be sorted. I painted the companionway washboards with ordinary Dulux exterior paint this year, and they have weathered at least as well as the marine paint used elsewhere, if not better, so for the superstructure I am going to use it for everything. I will still do the hull in Toplac as I like the colour and it doesn't actually take that much. The next few days will just be unloading and tidying up ropes etc.
26 August 2012
Some sun, lots of wind (24nm 273nm total)
There was just one good day forecast so I took the opportunity. Down to Poole in the evening and motored round the islands looking for a sheltered anchorage. There was quite a wind and I didn't fancy a noisy night. Eventually settled on Shipstal Point, which gives good shelter form a western wind. I really needed my navigation lights, as it was quite dark by the time I dropped anchor.
The morning was beautiful and calm. I raised all sailed and drifted away towards the harbour entrance. By the time I reached Brownsea it was blowing quite well, and I sailed out of the harbour mouth and went for a tour around Studland Bay, anchoring for lunch and a walk off Studland. When I set off, I felt that the wind was getting up, so put in a reef. Glad I did, it blew up to F6 through the afternoon. I sailed back in and tried to trace the channels up Red Horn Lake using the Navionics app on my phone. It isn't reliable enough to find such small features. And whatever they say, you cannot see the screen contents in sunlight. I anchored for a period but I noticed that the bright sun now had a fuzzy ring right around it and thought "that can't be good". I up anchored and sailed with just jib and mizzen. Up to 5 kts downwind, and about 3.5kts across the wind.
I had planned to pick up my mooring undersail, which would have meant I hadn't used the engine all day. But off Parkstone Yacht Club the wind started to swing around and a sailing race bore down on me, and so I started the motor to get a better grip on the situation. I think it was wise, the wind was strong and the moorings are very close together. Good day's sailing and possibly the last this season.
22 August 2012
More English Raid photo
 This was taken by Jeff Curtis in the Bayraidr Spark. On the Orwell on the way to Ipswich. I have retouched it slightly as I was mortified to see that I had left my fenders dangling. They are big, blue and very effective, but not attractive. So I have airbrushed them out. Vanity, vanity...
The rest of his photos can be seen on Picasa here

19 August 2012
Sailing in the sun, not far and not fast (15nm 249nm total)
Down for the day as it was so hot and sunny. The thermometer in my cabin went over 30C for the first time this year. Not much wind, so I sailed out to Studland for lunch. Then back in to Bramblebush bay where I anchored and rowed into the shallows. There is a huge area which is too shallow for any boat, but I can get my dinghy into it. I need to spend a whole day there one day and just explore the shoreline. Fantastic for birds. I saw two immature guillemots off Studland, which I have never seen before.
View Sailing August 19, 2012 in a larger map
Nearly made a hash of picking up my mooring. Sailed into the painter joining the dinghy to the pickup buoy. It came undone. So much for my round turn and two half hitches. Mad scramble and I managed to hook in the painter and tie to the Samson post. Then realised I was tied to anything else, but fortunately, the engine had kept on tick over for once and I managed to reverse back to the pick up. Noticed I have a couple of nasty scratches in addition to the one I filled last week. I don't have plans for any building work this winter, so I think I will spend the six months repairing all defects and finally giving the boat a complete repaint.
13 August 2012
Back in the Water at Poole (20nm 234nm total)
After the day out on the Thames, I have relaunched down in Poole. Always a bit of a rigmarole as I have to launch at Baiter and anchor the boat, lock the trailer, motor over to Parkstone Marina, tie up and leg it back to Baiter ( I had taken my folding bike for this, a bit of fore thought for once), bring the car and trailer over to Parkstone, lock the trailer and then finally get back into the boat. Motored over to Brownsea Island in the fading light with navigation lights finally doing their job (although it wasn't all that dark really). Peaceful night at anchor away from the horde around Pottery pier. SWam a lap around the boat, it was that warm, but noticed a nasty scratch in the topsides I caused when I launched her. She had been blown back onto some else's trailer before I could push her away. I filled it with Araldite to keep the water out. Another winter patching job.
View Sailing Aug 10 and 11-12.2012 in a larger map
Next day was a beautiful sailing day. I toured around the islands and went out and anchored for lunch in Studland Bay. Then stormed back into the Harbour on a broad reach doing 5-6.5 kts all the way. I managed to record each leg on my Android phone for once, although I have my doubts about the claimed maximum speed of 94kts.... In theory I could navigate with it, but it is too small to be practical. But it does show that a larger tablet could do the job. I also finally got the new stack pack sail bag to work with the lazy jacks, and I am a convert. Very easy to lower the main sail and then get it stowed away out of the wind.
Day on the Thames (8nm 214nm total)

View Sailing Aug 10 and 11-12.2012 in a larger map


8 August 2012
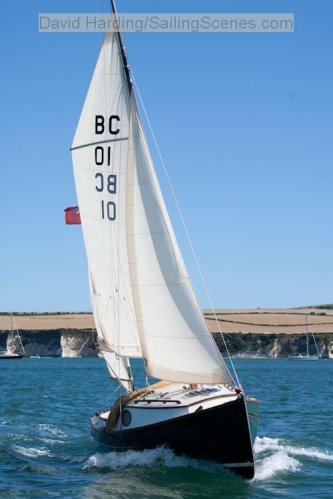
On the Orwell
This is a photo that Andrew Wolstenholme took of Daisy Grace just below the Orwell bridge, outside Ipswich. The beautiful little Lara in the background.


7 August 2012
English Raid 2012 (58 nm 206nm total)
Big sail of the year, the English Raid on the rivers Orwell and Stour in Suffolk. The map below shows tracks from my mobile phone showing the basic sailing, with some glitches. (Claimed 54kts speed is unlikely, but I did hit 8kts at least twice.)
View English Raid 3, 2012 in a larger map
I started the outing by treating Daisy G to a lift out and pressure wash at the marina. Not strictly needed, but there was a special offer on and I thought it worth it. Certainly stress free, and there was some weed on the bottom.
I towed her home for the night (three hours drive plus the three hours in the morning to tow the trailer to Poole) and then the next day towed her over to Woolverstone near Ipswich, where we were launching, another five hours driving. Very easy launch there, with help from others to hold her whilst I parked the car and wheel clamped the trailer.. Then a gentle sail down the Orwell into Harwich Harbour and locked into Shotley Marina.
The setting is dramatic. Felixstowe docks occupies an horizon, with container ships being loaded and unloaded 24 hours a day, with commercial ships and ferries coming and going all the time. An enormous wind turbine erecting rig appeared one morning and was gone the next. Survey ships trundled back and forwards (I now know what a diamond over a ball over a diamond means. It was shouted at me in fairly clear language...)
Shotley marina is enclosed with access through a lock, so gives a very peaceful night. No waves or swell, although you can here the docks on the go all night. It is overlooked by an ancient Martello Tower with a water tank now perched on it. Nice to still be useful at that age.
The lock is very easy to use as there are floating sides to it, which you tie tightly too and they slide up and down with you. We generally rafted up in a group to go through, but the lock keeper would let you through any time on your own. some of the boats on the raid were beautiful. This little Iain Oughtred Elf Lara was my favourite. Not only gorgeous, she flew like a speed boat. She beat the 30ft whaler Molly to Manningtree, which I should think is a record.
There were about 20 boats, but non from overseas. There were a few planned, but they cancelled when they discovered how much the ferry fares had been cranked up during the Olympics. I expect the ferries lost money on that.
The first full day we sailed up the Stour to Manningtree for lunch, then back down to Harwich for fish and chips before crossing back to Shotley. Beating all the way to Manningtree, then flying on a broad reach all the way back to Harwich. I hit 8kts on that run, some of the fastest sailing I have ever done. We raced from Mistley to Harwich. I did it in 1 hour 9 minutes. Molly did it in 52 minutes. The organiser said he had never known it to be done so fast. Several Bayraiders beat me, but they all had crew and were sailing unballasted. I didn't dare dump ballast, and had a reef in, but still beat several other boats.
On the second day we were due to sail to the Walton Backwaters but this was cancelled due to strong wind forecasts. Andrew Wolstenholme did sail out there with Kite and confirmed that cancellation was the right decision. He said it became quite wild. Instead the Raid sailed to Levington on the Orwell, but I diverted to Pin Mill, where I anchored and went ashore for lunch. There was due to be an afternoon race from Pin Mill, but the wind really blew up. I sailed with a double reef for a bit, but wasn't enjoying it, so lowered the mainsail and beat back to Felixstowe under jib and mizzen. Big standing waves there, so I motored back into Shotley. A friend came to have dinner with me in the evening which rounded off a good day.
On the final day we raced up to the Orwell Sailing Club in Ipswich. I was very brave and went under full sail for the first time. But no match for Andrew Wolstenholme's Kite, which just flies. A gorgeous boat, but she needs a full braked trailer, which I have tried to avoid in my choice of boats.
Kite sailing away from me. I just can't keep up with her in a strong wind.
After Ipswich we sailed back down to Woolverstone to pull out, although I would actually stay afloat until the next day as I prefer to sleep on the water rather than in a car park. We passed Freston Tower, a six storey Elizabethan folly we stayed in about a month ago. It belongs to the Landmark Trust and is wonderful.
Coming into Woolverstone I had my only mishap of the Raid. I fouled up getting my main down and banged into a moored yacht. The poor lady on board was just minding her own business on a sunny afternoon. My towing eye did some damage to her topsides so I hope my insurers can sort it all out quickly for her.
Hauling out the next day was the easiest I have ever done. When I backed my trailer down to the slipway, the crews of two other boats took over and Colin Henwood (part owner of Kite and master boat builder) cranked Daisy G back onto her trailer. I just had to strap her down and then drive her home ( six hours...) Andrew Wolstenholme said he was very impressed how I have adapted her for single handed sailing, which was a great compliment from an excellent boat designer.
Daisy G is in the garage at the moment and we might take her on the Thames before I take her back down to Poole, dependent on the weather.
Some general thoughts. My electrics worked fine. I recharged my phone and VHF, ran the depth sounder and GPS all day and used the cabin lights every night, with no apparent loss of power form the 20Ahr battery. The solar panel was showing that it was charging all the time.
I recorded all my tracks with the Navionics app on my Android phone. Some hiccups (I am sure I never really hit 54kts) but otherwise it worked OK. I couldn't use it for navigation as it was just too small. An iPad probably would be big enough, with a suitable waterproof cockpit mount.
Some boats on the Raid:


View English Raid 3, 2012 in a larger map
I started the outing by treating Daisy G to a lift out and pressure wash at the marina. Not strictly needed, but there was a special offer on and I thought it worth it. Certainly stress free, and there was some weed on the bottom.
I towed her home for the night (three hours drive plus the three hours in the morning to tow the trailer to Poole) and then the next day towed her over to Woolverstone near Ipswich, where we were launching, another five hours driving. Very easy launch there, with help from others to hold her whilst I parked the car and wheel clamped the trailer.. Then a gentle sail down the Orwell into Harwich Harbour and locked into Shotley Marina.
The setting is dramatic. Felixstowe docks occupies an horizon, with container ships being loaded and unloaded 24 hours a day, with commercial ships and ferries coming and going all the time. An enormous wind turbine erecting rig appeared one morning and was gone the next. Survey ships trundled back and forwards (I now know what a diamond over a ball over a diamond means. It was shouted at me in fairly clear language...)
 |
| Shotley marina, Felixstowe in backgrounf |
Shotley marina is enclosed with access through a lock, so gives a very peaceful night. No waves or swell, although you can here the docks on the go all night. It is overlooked by an ancient Martello Tower with a water tank now perched on it. Nice to still be useful at that age.
 |
| In Shotley Lock |
There were about 20 boats, but non from overseas. There were a few planned, but they cancelled when they discovered how much the ferry fares had been cranked up during the Olympics. I expect the ferries lost money on that.
The first full day we sailed up the Stour to Manningtree for lunch, then back down to Harwich for fish and chips before crossing back to Shotley. Beating all the way to Manningtree, then flying on a broad reach all the way back to Harwich. I hit 8kts on that run, some of the fastest sailing I have ever done. We raced from Mistley to Harwich. I did it in 1 hour 9 minutes. Molly did it in 52 minutes. The organiser said he had never known it to be done so fast. Several Bayraiders beat me, but they all had crew and were sailing unballasted. I didn't dare dump ballast, and had a reef in, but still beat several other boats.
On the way to Manningtree, Lara carving me up.
 |
| On the hard at Pin Mill |
On the final day we raced up to the Orwell Sailing Club in Ipswich. I was very brave and went under full sail for the first time. But no match for Andrew Wolstenholme's Kite, which just flies. A gorgeous boat, but she needs a full braked trailer, which I have tried to avoid in my choice of boats.
Kite sailing away from me. I just can't keep up with her in a strong wind.
 |
| Freston Tower, built 1597, from the Orwell |
Coming into Woolverstone I had my only mishap of the Raid. I fouled up getting my main down and banged into a moored yacht. The poor lady on board was just minding her own business on a sunny afternoon. My towing eye did some damage to her topsides so I hope my insurers can sort it all out quickly for her.
Hauling out the next day was the easiest I have ever done. When I backed my trailer down to the slipway, the crews of two other boats took over and Colin Henwood (part owner of Kite and master boat builder) cranked Daisy G back onto her trailer. I just had to strap her down and then drive her home ( six hours...) Andrew Wolstenholme said he was very impressed how I have adapted her for single handed sailing, which was a great compliment from an excellent boat designer.
Daisy G is in the garage at the moment and we might take her on the Thames before I take her back down to Poole, dependent on the weather.
Some general thoughts. My electrics worked fine. I recharged my phone and VHF, ran the depth sounder and GPS all day and used the cabin lights every night, with no apparent loss of power form the 20Ahr battery. The solar panel was showing that it was charging all the time.
I recorded all my tracks with the Navionics app on my Android phone. Some hiccups (I am sure I never really hit 54kts) but otherwise it worked OK. I couldn't use it for navigation as it was just too small. An iPad probably would be big enough, with a suitable waterproof cockpit mount.
Some boats on the Raid:


Subscribe to:
Posts (Atom)