31 December 2010

Thoughts on logbooks

Drumming my fingers waiting for things to get going after the weather improves I have been thinking about my logbook for next year. I always keep one and have posted a few notes about what I record on the Swallowboats forum

I print my onw logpages and keep them in a very thin very old four ring binder (one I originally used for my formula 1 car designs back when Jochen Rindt was my hero. That was a VERY long tome ago). The binder fits into my chart holder, along with a ToughChart collection, so I can reach it from the cockpit. I just record where I have gone, how long it took and how far it was. I used to keep more detail, but decided that was for offshore sailors, which isn't me. On the left is a page from 2010's log showing how it is set out.


In 2011 I am going to try it in the landscape format below, to see if I can get more notes in as that is the most interesting part.

17 December 2010

Snow stops play on the shed


The snow and ice has arrived. The builder has got all the wall frames up, the door surrounds cut out and all the ceiling joists in place. The next stage is the sloping roof rafters, but everything is covered in ice and it is impossible to do any more.

I think it's not bad for four and a half days work when its freezing cold and dark at 4:00pm. Judging by the forecast (imminent arrival of the next Ice Age) I think it unlikely that anything more will be done until after Christmas.

The electrician came and measured up for installing a power supply. Inevitably he said that to comply with current regulations he would have to renew a lot of perfectly good fittings. I dread to think what his quote will be. He said he wouldn't be able to get it to me before Christmas. I told him I didn't want it before Christmas.


After the rafters, the window openings need to be trimmed and then the boarding starts to go on. Everything is here except the roof coverings, so I hope it won't take too long to finish the job. Famous last words.

16 December 2010

Roof joists going on

View from the garden
View from the lane

The shed speeds ahead, with nearly all the wall framing up and the ceiling joists starting to go on. The pitched rafters will be trickier but shouldn't cause much of a problem. It is good to get a feeling for the overall volume of the building at last and the size of the main door. The weather forecast is dire. One of the papers is predicting the worst snow storm in "100 years" tomorrow. On past experience that could mean we will get a thaw and some sunny weather, but who knows. Sadly I can't see the roof being on before that.

15 December 2010

On the backsides of boats

There were a couple of interesting comments on a previous post about the engine arrangement in Daisy Grace and I think it is worth looking at in some detail. I think the Swallowboats solution to the problem is one of the best I have seen, and it sold the basic Bayraider design to me.

I used to have a Drascombe Dabber and I loved it, but it was the only yawl rigged Drascombe I liked. It faced the usual problem of how do you get around the conflict of mizzen mast/rudder/tiller/outboard engine position. The Dabber solution was to mount the engine to one side, the very small mizzen on the transom on the other side and the rudder on the transom, with a long tiller that just cleared the engine.

The bigger Drascombe yawls adopted an arrangement that I always felt I could never have lived with. The engine right at the back, where it is hard to reach to tilt up and sticks out the back when tilted, not pretty. The mizzen in the middle in front of the engine, which is good. But then the rudder is in front of the mizzen mast, sticking down through the bottom of the boat. In a design meant for sailing in shoal waters I just do not understand this arrangement. You can see in this photo how the whole steel rudder assembly has had to be hauled up when going aground. How can this be a good idea? I have heard Drascombe sailors extolling all the different ways you can steer in shallow water with paddles and oars. I like steering with the rudder. If you get caught drying out with the rudder down, or worse, have a kick up blade which kicks up and thus jambs the rudder under the boat, you are in real trouble. I really don't like this arrangement.

The Swallowboat Storm series have a curious solution, with the tiller behind the mizzen mast. All users (and the builder) assure me it works perfectly well. I have never tried it but it looks weird to me.

The Bayraider/cruiser solution is based on the massive stainless steel rudder stock. This supports the tiller over the engine, but then dips down below a stern bridge-deck which supports the mizzen and then forms the rudder head outside the transom. The only opening in the transom is a small oval to allow the stainless steel tube to pass through. This allows the rudder to be on the back, the mizzen to be inboard on the centreline, the tiller in front of the mizzen mast, above the engine and the engine to be able to be tilted right up, out of the water and inside the boat.

The only problem I have with this arrangement is that when the engine is tilted, it does protrude into the cockpit. Not a problem with one or two aboard, but it does make it a bit cramped with three or four. A smaller engine takes up less room. I have got a 6HP outboard. A little 2.5HP Honda is more than adequate for the vast majority of situations. If you can be bothered you could lift it off and put it in the locker.


You could just leave the engine down but that has a few problems. It does increase drag, a lot. It makes it harder to steer and if you are a dumb as me you forget to tilt it up on a drying mooring. Fortunately I was on such soft mud it just pushed down into it. The best boat I have seen with a fixed down outboard was my old Winkle Brig. This used a deep GRP skeg to protect and streamline the submerged leg. It slowed the boat down but did mean you had a remarkably large cockpit for a 16ft boat with a three berth cabin.

Shed frame nearly complete after two days

The basic frame is up, bar the panel to the righ tof the main door. Not bad progress for two cold, short winter's days. The window openings are to be cut out next. I am not planning any heating this year, so no internal insulation or lining, but I may put in a wood burning workshop stove at some stage if I start doing serious projects. I will need to insulate it if that is to be worth while, so that will be a future project.

14 December 2010

Shed framework going up fast

The builder only started on the shed framework yesterday morning and this was the state this morning. He is working as fast as he can as more dreadful weather is forecast after tomorrow. Can't see the roof being on by then, but who knows? Nearly all the wall frames have been finshed, they just have to be stood up and screwed down. Will Daisy G be undercover before Christmas? It could happen, depending on snow, ice, sleet, wind etc.

13 December 2010

Overall view of BayCruiser

This photo is a mosaic of two I took during the English Raid (can you spot the join?), looking down on Daisy G at low tide from the quayside at Keyhaven. I think is gives a very good view of the Baycruiser form. They are really quite beamy, although quite narrow at the waterline. This is partly why they have such high form stability. As soon as she starts to heel, a great chunk of the overhanging side is forced into the water and this in turn pushes buoyantly back. She is very stable even without the water ballast, but rock solid with it.


This photo, taken from the same quayside, shows a comparison between the original Bayraider (Simon Knight's fibreglass Carpe Diem in this case) and the Baycruiser. They really are quite different. The surrounding bulwark on the BC gives a really nicely enclosed foredeck. There is also no under-sidedeck stowage on the Bayraider, which is so useful on the Baycruiser (see the previous post to see the boathooks stored in this area). On the other hand, it has bigger under bench cockpit lockers on both sides plus a huge storage area under the foredeck. The original proposed cabin verison of the Bayraider was to have just a slightly raised and extended foredeck to form a "camping cuddy". I think there are still plans to pursue this. I wanted a full cabin to use as my Wendy house, as my wife describes it. Simon and I are convinced the  Baycruiser is significantly longer than the Bayraider, more than the specified 5 inches, but we never got round to actually measuring them.

This angle also clearly shows the original and revised positions of the jib sheet fairlead tracks. The originals, on the  cabin roof, were too close to the centreline, despite Matt insisting that they met all the theoretical design requirements. The new positions on the grab rails are a bit odd looking but work well. I am going to remove the original tracks over the winter.

Just to complete the comparison. This view gives an idea of the different cockpits of the Raider and Cruiser. The under side deck stowage shows up clearly. You can also see my stern ladder in its "deployed" position and the tiller control line, which hooks over a cleat on the under side. Knots in the line stop the tiller slipping and bungees at each end make it easy to whip on and off.


Just to complete the picture, this is the design that started it all, a Searaider, Pelham Olive's Lattis, tied up alongside Daisy G at Buckler's Hard. This is a racing boat with twin headsails on a permanent bowsprit, all sorts of adjustment tackles and a tiller controlled by tiller lines aorund the engine well. They even had trapeze wires. But... they had to sleep on board the Thames barge mother ship, whilst my daughter and I slept comfortably aboard Daisy Grace for five nights. Horses, or boats, for courses.

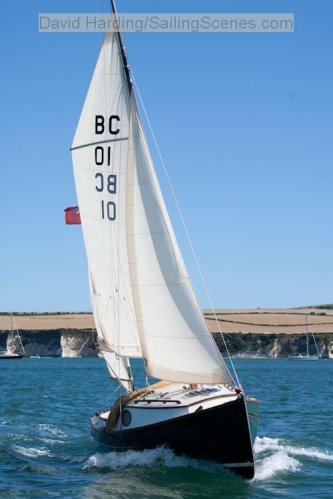
And finally (is there ever a finally) the one they are all talking about, the Bayraider 17, under sail and under tow. This is Matt Newland's own boat. I think it is a stunner. It is so sleek and simple inside. I see this as a big seller and a real replacement to the Drascombe Dabber, which was always my favourite.


The shed builder arrived on site this morning and started sawing bits of wood! Yay!

12 December 2010

New bulkhead going in

The weather has eased up at last and I could do a few jobs over the weekend. I have finished the main part of the new internal bulkhead and fixed it in place. It is held between hardwood strips glued to the cabin wall and ceiling, which should mean that it can be removed if it is a bad idea. But that will involve breaking the panel, it can't go in or come out as a single piece. I still have to fit a filling panel between the new bulkhead and the sloping compression post. That is made up and is curing in the utility room. So far I am happy with the result, but it is hard to judge until all the cushions and general cabin detritus is in place.

I have fitted two screwed and glued blocks under a cockpit side deck which support two staineless steel hooks each. These are to hold the boat hooks so that they don't slide around but have a place to live. The long boat hook is used to hook mooring buoys. It is meant to be adjustable but has seized solid, fortunately at the maximum length which will fit under the side deck. The wooden boathook is an Irish heirloom from my first Drascombe. It goes in every boat with me. It has 0.25m markings on it so I cab use it as a shallow water sounding rod, for which use it is perfect.

9 December 2010

Small bits of work in freezing weather

I can't do anything on the boat because it is so cold. I have been working on the new bulkhead I want to install in the house. Basically it is 9mm t&g pine boarding screwed and glued to a 4mm plywood backing. The plywood is in two sections, partly because that was the maximum width available locally, but in fact a complete panel would be impossible to fit into position because of the  taper of the cabin roof. The joint is covered by the third board in from the right. I have dry fitted it and it does fit, all be it very tightly. The sequence is: the boards are screwed on to the plywood on a layer of "no more nails" wood glue. When the glue is set, the screws are removed, and this has worked, more or less. (Poor man's vacuum bagging.)

When I have fitted the two parts in place, the final loose board will be snapped into place and screwed and glued to the plywood over the joint. Then the screws will be removed when the glue is set and hopefully I will have a reasonably flat panel of tongued and grooved boarding to the main cabin and smooth ply into the "fore cabin". I will fill and undercoat the bulkhead panels in the house and just put the top coat on in the boat when it is warm enough, after filling in last screw holes and the panel joint.

One dodgy thing I have done. Two of the boards cupped quite badly (curved up due to expanding on the sides facing the plywood). I have sprayed the outer face of these boards with a water spray for the last two days, and they have actually flattened. Whether this will hold after I have painted it is anyone's guess. I can see why professionals use vacuum bagging. It is impossible to clamp baords flat fully any other way. Screws don't really do it.

5 December 2010

Wintery storage

When the builder will be able to start again is anyone's guess as the weather is awful. Barely above freezing and we have lying snow up here in the hills. I can see Daisy G up the garden from our study, standing on the shed base.All the wood is there as well, the ultimate Ikea flat pack. It just needs to be cut, nailed and painted. At -5C...

3 December 2010

Shed planning approved

Just heard that our boatshed plans have been approved so now we can carry on building. Shame there is two feet of snow on the site rather than on the roof of the finished shed as originally planned. Such is life.

25 November 2010

Shed plans

All being well, work will start again soon on my boat shed. The long section will house Daisy G with room to move around her. It has to be quite a lot longer than the boat to allow for the trailer and the projecting rudder. I want to just be able to back her in without having to take any part off. The offshoot on the side will act as a workshop. Come the summer I can even park a car in her! There is room at the front to park a car behind the stone wall.

The intention is that the building will just appear as a small wooden shed, set behind the trees. We live in the Cotswold Area of Outstanding Natural Beauty, so the planners want as little visual impact as possible. Hopefully this will keep them happy. We will soon hear.
I have to decide if I should have a workshop stove. It is so cold in the  winter that any work using epoxy is near impossible. A stove burning sawdust and offcuts might just make it possible.

21 November 2010

Weekend jobs progress bit by bit

The long dark nights in these northern climes mean that evening work is a non-starter, at least until my shed eventually gets finished. In the mean time, bits are done over the weekend, other activities permitting. Most of the time is spent pulling the tarpaulin off and then back on again.
I have built a completely new stern platform for the boarding ladder out of good quality 18mm marine playwood. Five coats of teak stain and now it is in place. Still needs to be bolted on with some new, correct length stainless steel bolts. I need to build up a shopping list of screws and bolts and then order them in a single post. They become impossibly expensive otherwise.

I have finally seen sense and thrown away all of my "car boot organiser" bags and bought a proper marine cockpit bag from Blue Performance. It fits under the companionway perfectly and it will hold the gas bottles, sail ties and sun tan lotion. What else do you need in a cockpit? It did just fit in place, but I have cut back the central duckboards a bit so that it has its own space.

I have also roughed out a template for the extended bulkhead I am planning. It should give a modicum of privacy to the fore berth. At the moment, if you are on a pontoon, anyone walking by can see the entire interior. With a full height bulkhead to port there will be "somewhere to go to pull up your knickers" as my wife delicately puts it. The plan is to build it out of tongued and grooved matchboarding (9mm thick) backed by thin plywood. It will take a deal of head scratching to sort it all out.

13 November 2010

Start of Winter Work

Daisy G is back home from Swallow Boats after some expert work. Sitting under a tarpaulin for now as we await sorting out the planning for her new shed. All being well that will be within a couple of weeks and she will be under cover not long after that, weather permitting. The shed base gives a place to stand her and it is very sheltered. Just not much fun for working on her.

New work by Swallow Boats: Two extra cabin top hand grabs just by the hatch. I have wanted these all year. This is just the spot you grab for when getting in from a dinghy, and there is nothing there. Now there is, and they will provide a place to tie the dingy to when loading it as well. I had planned to fit them myself, but decided that a professional job would be stronger and better looking.

Second new bit: a proper bow roller, as is fitted to the latest BayCruisers. The alloy one I fitted was a bit rough and I really need a strong one as I keep her ona swinging mooring. This should do the job.


First of my jobs: swapping the hinges across on the anchor locker lids. Now they hige outwards, which means they are out of the way and don't keep falling shut. I still need to drill new finger holes, but that shouldn't be beyond me. I had to plane the opening edges so they didn't bind. A bit of epoxy needed over the exposed plywood and the old screw holes filling. I am planning to repaint the whole boat in March, so it will all be tidied up then.
I have also cut out a new boarding ladder platform in thick marine ply. The old one was delaminating. That all needs glueing up and finishing.

7 October 2010

End of season summary

The season is over and Daisy Grace is back home awaiting winter titivating. A summary of the 2010 sailing season from Poole:

View 2010 cruises in a larger map

Number of visits down to the boat: 22
Total distance sailed: 417nm (I drove 10 times as far as I sailed...)
Nights on board: 16
Crew on occassion: 1 daughter, 1 wife, 1 sister and 5 friends
Cruising range: Swanage in the south, Wareham in the west, River Medina in the East and Southampton Water in the north
Biggest Cruise: English Raid for five days, sailing to and around the Western Solent
Oddest cruise: modelling for the Practical Boat Owner photographer for the Baycruiser review.
Best anchorages: Studland cliffs, anywhere off Brownsea Island, in the shallows below Shipstal Point.
Best Marinas: Parkstone Bay, Poole; Bucklers Hard, Beaulieu River
Worst anchorage: Swanage because of the disco on shore.

Plans for next year? Motoring down the Thames before relaunching at Poole. Getting at least as far west as Chapmans Pool and maybe even Weymouth.

3 October 2010

Season well and truly over. Daisy G out of the water and back home

I was lucky for once. The weather has been atrocious, but it broke just for one day on Saturday which is when I went down to fetch Dasiy G back. If it had been stormy I just couldn't have done it on my own. As it was, the only problem I had was the Baiter slipway at Poole. It was as slippery as oil and I fell over twice, running from clipping her on back to the winch handle. A kind soul held her straight for me as I cranked her on. The only small problem was that the winch webbing strap kept going off centre and over running the gears, but she came on fine. I was able to haul her out in shallow water with the trailer still hooked to the car. Everyone else was having to unhitch and push their trailers into deeper water. The shallow draft with the ballast pumped out is a real blessing.


This photo shows her all loaded up,ready to roll. A couple of thoughts. She was so "nose light" that when I unhitched her to get the engine off, I didn't have to push the hitch up, it went up on its own. Made getting the motor out easy, but I have heard that the weight on the hitch should be about 50kg, not 0kg. When I got her home, I loosened the forward rollers (she rested on the keel roller), then loosened the winch post and moved it 200mm closer to the car, and then retightened the forward rollers to just prop her in place. Should imrpove the balance a bit.

I also noticed that the mast could be slid further forward, to come within the rudder projection. The two part mast really ins't necessary, it stows like this fine.

You can see the wet mark showing the difference between the ballasted and unballasted draft. The CopperCoat antifouling is brilliant, nothng but a bit of slime on it. But where the water touched the green paint or white boot top, green weed grew happily. I shall repaint the boot top with white antifoul over the winter, and maybe make it a bit wider.

Daisy G's shed is far from finished, so she will have to sit out for a while.

21 September 2010

Boat shed advances in fits and starts

My boat shed is coming on. The slab was cast today so I can finally see the layout. Looks enormous like this. Daisy G will sit on the long leg of the L whilst the right had leg will be a workshop. It will be timber from here on up, so shouldn't take too long to build. The builder reckons about a month. Getting the boat in will be fiddly as the lane is too narrow to just back straight in. I will have to unhitch the trailer, swing it around and hope I have enough oomph to push it back in.

Thinking of workshops, I have been carrying out some very rough and ready tests on the strength of epoxy/ply filleted joints. I was interested to see if the fibreglass tape is really necessary on the inside. Results were interesting and I have been posting them on the Wooden Boat forum:
http://forum.woodenboat.com/showthread.php?119666-Beginer-s-Epoxy-plywood-query

19 September 2010

Last sail of the season 8nm (417nm total)

Down just for the day to get Daisy G. ready for haul out. It was a beautiful date, but an edge to the temperature and the sun sets at 7:15. I noticed when I got on board that my jib sheet had been wrapped around my mizzen, which is not how I left it. Further inspection showed that the ties around the mizzen sail had slipped off and the sail must have been flogging. Someone had come on board and wrapped the sheet around it to stop it ripping itself apart. The mizzen sprit was a bit bashed and the ensign has disappeared but apart from that no damage. Nice to know someone is keeping an eye out and did something about it.

There was the gentlest of wind, so I decided to sail off the mooring for the fun of it. By all my calculations, I should have drifted slowly backward with just main and mizzen loose. But as soon as I cast off the mooring, she started to drive slowly forward. I just missed the neighbouring boat. I'll never get the hang of this sailing business.

I sailed very slowly across the harbour and round Furzey and Green Islands. Only one tack needed and then round to Brownsea Island, where I anchored and went ashore for a walk. I was aground when I got back, so I pumped out the ballast tank and was able to push her off. I motored straight back to the marina and tied up to the pontoon. Unloaded an embarassingly large amount of stuff, took off the sails and then lowered the masts. The carbon fibre is worth it, lowering the main mast is a completely undramatic affair.


As I was stowing everything two little girls came running down the pontoon from a boat that had just tied up behind me.

"Guess what my sister's name is!"
"Ooh, I don't know, is it Mary?"
"No, it's Daisy Grace!"

I congratulated her on an excellent name. My Dasiy Grace is back on her mooring, looking a bit folorn with her masts down. I shall haul her out at the begining of next month.

6 September 2010

Peanut sails

I have made up a sail for the Peanut model which is is as near as I can judge the size and proportion of the mizzen sail and mast from the BayCruiser. It looks much more possible than I imagined. It is tall, so the healing effect of the mast will be significant, but it is carbon fibre so the weight will not be great. The sail area doesn't look too bad and the short length of the boom is positively beneficial. I would envisage just a single rope from the boom as a sheet. Maybe a couple of thumb cleats to hook it round on the quarters, but probably just held in the hand.

I have also found that I can get some Asian marine ply locally for about £25 a sheet. Not the best I suspect, but good enough I should think. It is meant to be a two sheet boat, but that doesn't include the fore deck, rudder and lee board, so I shall need three sheets. That should mean that potentially £100 would cover ply and epoxy.

5 September 2010

Progress, of sorts, on Peanut

I am still toying with the idea of building a Peanut Pram. I have gone as far as buying a bag of cable ties to hold it all together. I have also done what they always says you should do, and built a small card model. Surprisingly easy. I just printed out the basic plan to fit an A4 page. Then pricked through the plans onto thin card to mark the points, joined the dots, sliced out the parts and sellotaped them together. It really does show you how the panels have to twist to form the shape. It is surprisingly elegant and very satisfying to do. The only change I have made is to put in a longitudinal seat. I have got long legs and I really need a lot of leg room. This would give a chance of getting it right. You can't row with bent knees.


Getting near the end of the season 14nm (409nm total)

Down to Poole for a night and a day. Bright weather but the sun never blazes and the nights are coming rapidly earlier. I drove down after work and motored out to Brownsea Island to anchor out for a flat calm night. Only disturbance was the bangs of fireworks over Poole, but I couldn't see them. In the morning I fitted some small electrical conduit which I bought at Maplins to tidy up the various cables from batteries and solar panels to the radio and GPS. It was very succesful. Looks good and stops me tripping over the wires. I had to buy three times as much conduit as I needed, but I might redo the whole thing over the winter now I have got the idea.
The only other change to the boat was to the mizzen. I have rigged a conventional snotter rope (interesting term) to tension the sprit boom. It work well and it stays tight, which the original outhaul never did. The only problem is that the main sheet can snag the heel of the sprit, but I think a bit of fine tuning will help relieve that. I am also planning to move the point where the main sheet fixes to the boom further forward, which is how I think it is done on the later boats. I took out the dinghy and various bits and pieces and took them home in preparation for hauling out later in the month.

The shed progresses and is quite dominant at the head of the back garden. But hidden from view in all directions.

1 September 2010

Peanut Pram

I've received the plans and manual for the Peanut Pram and I think even I could build this one. It seems to omit many of the parts of other boats I've looked at. It will be interesting to see if those parts are really needed.

The plans came as a PDF file within a few minutes of placing the order. They can be printed out full size, but as all the measurements are pretty clear (in inches) it should be easy enought to plot them out from small prints. The manual seems detailed enough to tell me what to do.
The costs are still significant. Two sheets of 6mm marine ply is well over £100 and epoxy resin and glass fibre tape will add quite a chunk to that. The trick will be to buy all the parts seperately over a period of time and never to add it all up.  Plans are from
My cunning plan is to use the mizzen from Daisy G as the mast and sail for this. The sail areas are about the same, but the mast will be about twice the height. That couldn't possibly cause a problem, could it?